Get it on Paper
Put your plan on paper. This process alone can often point out unforeseen issues before the digging begins.

Get to Know Your Property
This is where people get stuck. They see professional renderings and think “I can’t do that.” That’s okay. “Don’t let the perfect be the enemy of the good.”
This is a Get-to-Know-You process. Getting to know your corner of Texas, what you want and what is possible. Putting ideas on paper allows you to identify problems that can just be erased before spending time, effort and money.
A WORD ON SCALE
The larger your yard, the smaller your scale may need to be. The more feet each square represents, the smaller the scale. For example, 1 square equals 10 feet (1:10) is a smaller scale than 1 square equaling 1 foot (1:1) and shows a larger area.
Step One: Get Supplies
Get some graph paper and tracing paper. Decide what your scale will be. Does one square equal one foot, two feet or more? You’ll also want a measuring tape. If you have the house plat you received when you purchased your home, have that handy too and consider making extra copies to sketch on.
Step Two: Draw a Basic Plan
Show the house edges and any things you know will not be moved or removed. Include dimensions and cardinal directions (north, south, east and west) to the plan. This will be important for successful plant selection. Make copies.
Step Three: ID Basic Elements
Use the copies of your basic plan or use tracing paper over the basic plan to draw the various elements of your garden. Draw out:
- Assets and Liabilities: This is where you note any drainage problems, significant slopes, utilities lines, good view, bad views and how you may view the garden from inside the house.
- Functional Sketch: Experiment with different layouts on how you might use your property. Include:
- Public Areas: driveways, sidewalks, entryway
- Private areas: patios, privacy planting, recreation, flowers
- Service areas: trash cans, AC, shed.
Step Four: Sun/Shade
Using one of your basic plan copies or tracing paper, make a Sun/Shade Chart of your garden. Watch our video that explains this process.
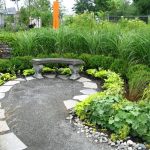
Step Five: Materials and Plants
Time to make some decisions on the style of your garden, and the plants and patio materials that will reflect your style. Your local site conditions should inform your plant selection but with some imagination and research, almost any garden style can be designed. Spend some time on our Find a Plant section and attend some of the numerous local workshops (many free) and ask questions! Follow our Basic Design Principles and design like a pro.
Step Six: Budget and Phasing
Now that you have your plan, it’s time to price out your dream garden. First, familiarize yourself with coupons and rebates available from SAWS and other sources. Your patio will likely be your most expensive item. Ideally, you would install the patio and any pathway first, but if your budget doesn’t allow then remove the turf where you want your patio and thickly mulch the area for a later phase.
Working with Your HOA
If you have a mandatory HOA, you likely must have your plan approved before you start work. Don’t let this stop you. Draw out your plan on a copy of the home survey you received when you bought your home. Attach a letter explaining your plans. Or hire a professional designer to submit a plan.

Meet with the HOA representative if you can. Be prepared for a back and forth process before your plans are approved. HOAs in the SAWS service area cannot require grass per city code (Ch.34-274(8)b.) but they can require landscape choices that reflect the general character of the neighborhood. Including a basic maintenance plan may help.
Related Video

Related Article

Find a Plant